Todays Greeting

Todays Greeting
Good Morning

Monday 29 April 2013

Lasso Tool (Photoshop)

Lasso Tool is a selection tool useful for drawing freeform segments of selection borders. There are three types of Lasso tools. Click on the Lasso Tool button with mouse right button to access Lasso Tool or Polygonal Lasso Tool or Magnetic Lasso Tool. ‘L’ key on keyboard is the shortcut for Lasso tool. Use Shift+L key to change from one Lasso tool to another Lasso tool.

Three Lasso Tools


Lasso Tool is useful for drawing freehand selections on image. To draw a selection with this tool drag around the object or drag any particular area and bring it to starting point. Otherwise starting point and ending point will connects automatically.

Polygonal Lasso Tool is used to select in straight lines with points. To use this tool just click points around the object or any particular area and bring it to starting point. While drawing we can come back to the previous points by using Backspace key or Delete key on keyboard.

Magnetic Lasso Tool is used to select any object by dragging around any object nearer to its border. It attracts or snaps to the border edges of the object with selection points. It also requires the starting and ending points to be joined. Delete key or Backspace keys can be used to come back to the previous points.

Lasso Tool or Magnetic Lasso Tool can be changed to Polygonal Lasso Tool by pressing Alt key on keyboard. After leaving Alt key and clicking on the image the tool will change back to previous Lasso tool.

Sunday 28 April 2013

Marquee Tool (Photoshop)

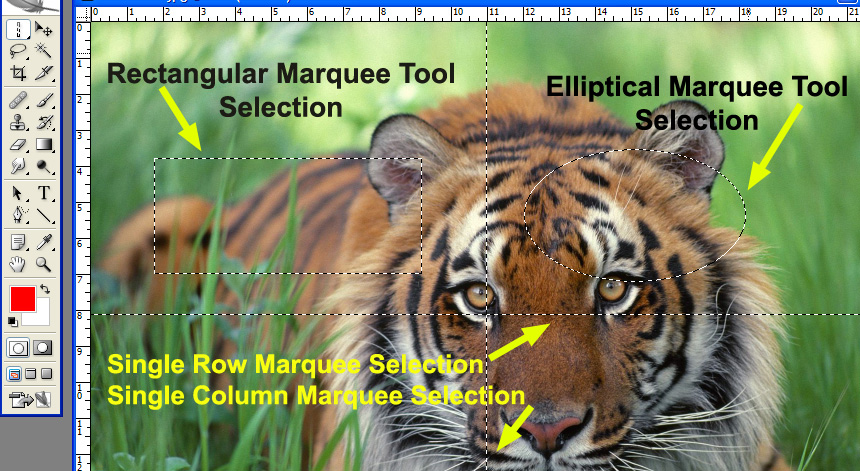
Marquee Tool is used to select a part of the image or layer. There are four types of Marquee Tools; those are Rectangle Marquee Tool, Elliptical Marquee Tool, Single Row Marquee Tool and Single Column Marquee Tool. These four tools located in a single tool button at top of the Toolbar. Click on Marquee tool button in the tool box with holding left mouse button to select any of the four tools. In keyboard press “M” button to change any tool to Marquee tool. If Shift ‘M’ is pressed, the tool changes from Rectangle to Elliptical Marquee and vice versa.

4 Marquee Tools


Rectangle Marquee tool is used to select rectangle selections with different height and width. While drawing selection on image (without having any selection), hold down Shift key on keyboard to constrain the selection in a square shapes (equal width and height).
Elliptical Marquee tool is used to select elliptical or circle shapes. To get circular selection hold down Shift key on keyboard while drawing selection on image (there must be no selection on the image). If there is selection, circles can’t draw but selection will add to another selection.
Single Row Marquee tool is used to select horizontal row of pixels (entire width).
Single Column Marquee tool is used to select vertical column of pixels (entire height).

Marquee Tool Selections


If there is selection on image use these Keyboard keys while drawing selections:
To add selection to another selection use Shift key.
To subtract selection from an existing selection use Alt key.
To intersect selection with existing selection use Shift+Alt key while drawing.
If one selection is drawn, existing selection will deselect.
Click on image (outside selection) with any selection key or press Ctrl+D to deselect.
To move selection click on selection with any selection tool and move to desired location of the image.

Note: Any quetions about my post please conmment and I will answer immediately.

Thursday 25 April 2013

Move Tool (Photoshop)

The move tool is located at the top right of the Photoshop Toolbox. The Move tool is used to move a selection on an image of selected part of layer or entire selected layer by dragging it with mouse or by using keyboard arrows keys. Hold down Alt key on keyboard to copy the selection or layer object. If Alt key is not pressed while moving, the selected part will move but it cuts from original location. With this Move tool any Layer or selected part of the layer can be copied from one image to other opened image by dragging and dropping. Guides and Annotations can be moved with Move tool. After moving the Annotations, Move tool will change in to Annotation tool.

Move Tool Selected


After selecting the move tool, click and drag anywhere in the image. If an area is selected the selection will be moved, otherwise the whole layer will be moved. While moving the objects on the layer with Shift key pressed then the object will moves in straight lines (Horizontal, Vertical or Cross). If Snap options (In main menu View -> Snap to -> Guides, Grid, Layers, Slices and Document Bounds) are selected, then the objects in the layer will move with breaks at Guides, Grid, Layer edges or center points, Slices and Document Bounds (Four sided image edges). If there is no snap, the objects will move freely on the image without any brakes. Double click on Guides to open Preferences-> Guides, Grid and Slices Popup menu.

Preferences Popup Menu


Guide Line and Selected Part of the Image


If mouse right button is pressed with Move tool selected, then a popup menu will appear showing all the layer names under the move tool. From that popup menu any layer can be selected directly by clicking on layer name. Locked Background layer cannot be moved with Move tool. If Background Layer wants to be moved, then double click or Alt+Double click on it to convert from Background Layer to normal Layer. Paths on the Image also don’t move with Move tool. To move Paths, use Path Selection tool. Alternatively, use your arrow keys to move the selection or layer in small increments. Hold down the Shift key to move in larger increments.
You can activate the move tool when another tool is selected by holding down the Ctrl key (Windows) or Command key (Mac OS). Shortcut for move tool is “V”. Press “V” button on keyboard to switch on Move tool from any other tool.
Note: If any doubts or questions please comment. I will respond immediately.

Popular Posts