Todays Greeting

Todays Greeting
Good Morning
Showing posts with label ppk2dtutorials. Show all posts

Thursday, 23 May 2013

Eraser Tool (Photoshop) – Part 2

Eraser Tool and Three Modes


Eraser tool Pencil mode is similar to Brush mode eraser. Shortcuts and everything is same. The difference is Brush mode eraser has smooth edges. It fills with light color and less opacity in gaps between pixels of brush shape edges. Pencil mode eraser it sharp edges because it doesn’t fills any pixels at gaps of curved edge pixels. It deletes complete pixels under the eraser brush shape. If less part of pixels will not delete.


If we want to delete in straight line, with eraser tool click on one palace and click with Shift key on keyboard pressed on other place. Then starting and ending points we clicked will be joined and deletes in a straight line. We can do it continuously while deleting with eraser tool using Shift key on keyboard pressed. This process is same to all three Eraser modes.


Block Eraser mode is different from Brush and Pencil modes. In this mode eraser tool shape is in square shape. It deletes entire pixel under the brush tool like Pencil eraser mode. Block eraser shape cannot be changed. In Zoom in and Zoom out the size is same. We can’t increase or decrease Block eraser size on any size or any Zooming percent of the image. This mode is useful to erase exact pixels.

If Alt key on keyboard is pressed while erasing, the eraser tool will change into History brush tool. That means, if we want any deleted part of the image, press Alt key with same Eraser tool at that place. Erased will restore at that place. This option is common to all three Eraser tool modes.


To erase completely, use full opacity (100%) on top of the menu. In right click popup menu you can change Diameter, Hardness and Brush Shape. If less hardness is given, the edges of the eraser shape will be lighter and smooth. If full hardness (100%) is given in Eraser Brush Palette, then erase with complete opacity with eraser shape.

Note: I will explain about Brush Tool in future post.

Wednesday, 22 May 2013

Eraser Tool (Photoshop) – Part 1

Eraser Tool


Eraser Tool is used to erase any part of the selected layer on the image. Eraser tool is commonly used for removing backgrounds from images. Eraser tool is very important tool in Photoshop. The shortcut is ‘E’. We can change to Eraser tool by pressing ‘E’ on keyboard or click on Eraser tool on tool bar.

There are three types of Eraser tools. Those are Eraser Tool, Background Eraser Tool and Magic Eraser tool. The shortcut is common to these three tools. But, the type of erasing is different. First tool is normal Eraser Tool. In this tool there are three modes on top of menu. Those are Brush, Pencil and Block.

If Brush mode is selected, the eraser shape will be in brush shapes. We can use any bush shape to erase. For increasing and decreasing eraser brush shape size use ‘[‘key on keyboard for decrease and ‘]’ key on keyboard to increase eraser shape size. When ‘Caps Locks’ key is on, the eraser shape will appear in ‘+’ symbol and we can’t see the shape and size of the eraser. So, while erasing switch off Caps Lock key.

I will explain the remaining two Eraser modes in my next post.

Thursday, 9 May 2013

Pen Tool (Photoshop) – Part 3

Using Pen Tool for removing Background:
  1. Open (File -> Open or Ctrl+O on keyboard or Double click any ware on empty place of Photoshop) the image which you want to remove background.
  2. Duplicate it by right clicking on title bar of the image or use Image menu-> Duplicate option.
  3. Close the original image. Save the Duplicated image with desired name and keep it open to start work.
  4. Double click or Alt+Double click on Background layer in layers palette to convert Background layer into normal layer. It is useful to make the image with transparent background.
  5. Now select Pen tool on tool bar or press ‘P’ on keyboard to switch Pen tool.
  6. With Pen tool click the starting point on right side of the object and start placing smooth and corner points around the object and cover the background area. Bring the path to the starting point and click on starting point to close the path.
  7. To adjust any point with Pen tool, Ctrl+Click on path to select and visible anchor points of the path. If you click the path with Ctrl key on keyboard, the Pen tool converts into Direct Selection tool. So, we can adjust any anchor point (moving anchor points near to the edge of the object).
  8. If you want any corner anchor point to convert into smooth anchor point or smooth point to corner point press Alt key on keyboard and click on anchor point.
  9. After adjusting path nearer to objects border, press Ctrl+Enter to convert path into selection. If you want to inverse selection press Ctrl+I.
  10. Now delete the selected background.
  11. Create new layer behind object layer by Ctrl+Click on Create New layer button on bottom of the layers palette to check whether background deleted completely or not.
  12. Fill color in newly created layer by pressing Alt+Backspace or Ctrl+Backspace key on keyboard. Now we can see some small background parts remaining. To clean the image use Eraser tool.

Pen Tool (Photoshop) – Part 2

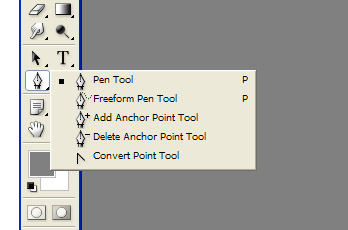
Pen Tool – Pen Tool is to draw Paths by clicking and dragging on the image.
                            

                             Pen Tool                                                                         Path


Freeform Pen Tool – Freeform Pen Tool is to draw paths in freehand mode. No need to put points by clicking on image to draw paths. Just drag with this tool to draw paths. It’s like Lasso tool. Magnetic option on the top of the menu is selected and then the tool acts like Magnetic Lasso tool with paths instead of selection border.

Add Anchor Point Tool – To add Anchor points at the middle of the path. We can add anchor points anywhere on path. Just click on paths and don’t click on Anchor points.

Delete Anchor Point Tool – This tool is used to remove Anchor points on path. If we click on any Anchor point with this tool then that point will removed. We can remove entire path by clicking on all Anchor points.

Convert Point Tool – Converts smooth Anchor points to corner Anchor points without directional lines. It removes the directional lines or breaks the directional lines of Anchor point. By clicking and drawing on anchor point, a new directional line will create.


Direct Selection Tool – This tool is used to select Paths, Anchor Points and Directional lines. With this tool the path shape can be changed or modified. Shortcut is ‘A’ key on keyboard.

Path Selection Tool – This tool is useful for select and move paths without changing paths shape from one position to another location or image. Shortcut is ‘A’ key on keyboard.

Note: In my next Post (Pen Tool - Part 3) I will explain how to use pen tool and how many options use pen tool paths.

For questions please comment.

Wednesday, 8 May 2013

Pen Tool (Photoshop) - Part 1

PEN TOOL 


Pen Tool is one of the important tools in Photoshop and located in Toolbar. The shortcut of Pen tool is ‘P’ key on keyboard. Lines drawn by Pen tool are called Paths. Each path has Anchor points. Each Anchor point has Directional lines. A Path can have any number of Anchor points and the minimum points are two (starting point and ending point). Paths can be converted into selection by pressing Ctrl+Enter key on keyboard. Vector Mask also requires Pen tool paths. When Pen tool is selected there are two options on top of the menu and those are Shape Layer and Paths. If shape layer is selected while drawing paths with Pen tool, Paths will be drawn with paths and foreground color fill. If Paths option is selected then only paths will draw. To define custom shapes (creating new shapes), the shape must be in paths mode. If path is available on image then Define Custom Shape option in Edit menu will appear and we can change into shapes.

To draw Paths with Pen tool there are five types of Pen tools. Those are Pen Tool, Freeform Pen Tool, Add Anchor Point Tool, Delete Anchor Point Tool and Convert Point Tool. There are other two tools are there on tool bar called Path Selection Tool and Direct Selection Tool for controlling Pen tool paths.

Note: I will continue in my next post five types of Pen tool and how to draw paths with Pen tool.

If any questions please ask me by mail or comment.

Select Menu (Photoshop) – Part 3

Select Menu Options (Continued form previous post):


Grow – It is similar to Magic Wand Tool with Contiguous option selected. It grows the existing selection. It uses Magic Wand Tool Tolerance value to grow the selection. It selects the same color pixels inside existing selection with Magic Wand Tolerance. If two colors inside the selection, then the two color pixels will select with Magic Wand Tool tolerance.

Similar – This option works like Magic Wand Tool without Contiguous option selected. It works like Grow option but it selects disconnected areas of the image. It also uses Magic Wand Tool Tolerance value to select the pixels of the image.

Transform Selection – It works like Free Transform option in Edit menu. Free Transform transforms layer objects but Transform Selection transform for any selection. With this Transform Selection we can transform any selection on the image like Scale, Rotate, Skew, Distort, Perspective, Warp, Rotate 180, Rotate 90 CW, Rotate 90 CCW, Flip Horizontal and Flip Vertical.

Save Selection – Saves any number of selections one after one for further use. It stores in Photoshop memory. If the image is closed then saved selections will not available. To save any selection on image use this option and give same name for it. If we want other selection to be saved do the same process.

Save Selection Menu


Load Selection – Loads the saved selection. If there is any existing selection on the image while loading selection then the Load Selection popup menu shows saved selection names. Select which selection we want to load and select any of the four options (New Selection, Add to Selection, Subtract from Selection and Intersect with Selection). If there is no saved selection this option will not available.

Lad Selection Menu


Tuesday, 7 May 2013

Select Menu (Photoshop) – Part 3

Select Menu Options (Continued form previous post):


Feather – This selecting menu option is useful for giving feather (Soft edges) to already drawn selection. This feather option can be given to any selection on the image and then soft edges will apply to existing selection. If feather value is not given to any selection before drawing on the image and we want to give feather to that selection then this option is very useful. If more feather value is given in pixels, then more softness will apply to the selection. This result can be seen after apply some operations like filling color, coping image to other image or location, applying mask etc.

Note: Remaining options will continue on next post.

For questions please comment.


Modify – Modify has four options (Border, Smooth, Expand and Contract). This option is useful for selection like Magic Wand Tool selection. Border split the selection border into two selections and gives feather. Smooth is useful for rounding for sharp corners and sharp corners of the selection will convert in rounded corners with given radius. Expand is used to spread more pixels with given pixel value with same shape of selection. Contract is used to reduce the size of the selection with given value of pixels.

Sunday, 28 April 2013

Marquee Tool (Photoshop)

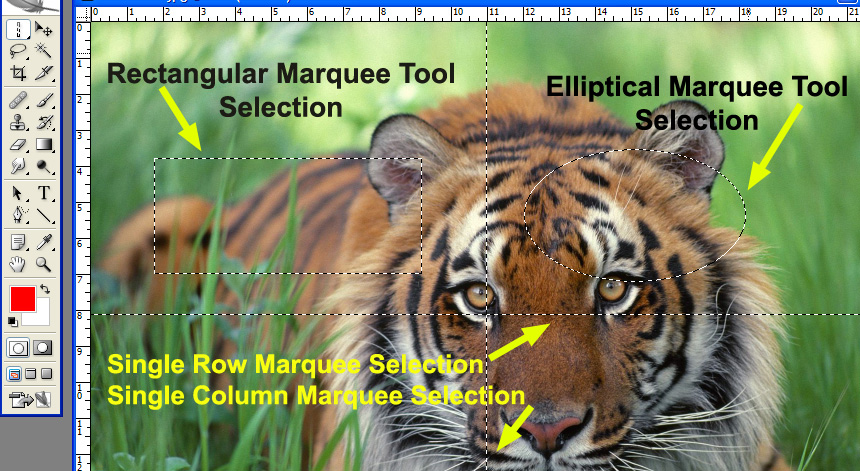
Marquee Tool is used to select a part of the image or layer. There are four types of Marquee Tools; those are Rectangle Marquee Tool, Elliptical Marquee Tool, Single Row Marquee Tool and Single Column Marquee Tool. These four tools located in a single tool button at top of the Toolbar. Click on Marquee tool button in the tool box with holding left mouse button to select any of the four tools. In keyboard press “M” button to change any tool to Marquee tool. If Shift ‘M’ is pressed, the tool changes from Rectangle to Elliptical Marquee and vice versa.

4 Marquee Tools


Rectangle Marquee tool is used to select rectangle selections with different height and width. While drawing selection on image (without having any selection), hold down Shift key on keyboard to constrain the selection in a square shapes (equal width and height).
Elliptical Marquee tool is used to select elliptical or circle shapes. To get circular selection hold down Shift key on keyboard while drawing selection on image (there must be no selection on the image). If there is selection, circles can’t draw but selection will add to another selection.
Single Row Marquee tool is used to select horizontal row of pixels (entire width).
Single Column Marquee tool is used to select vertical column of pixels (entire height).

Marquee Tool Selections


If there is selection on image use these Keyboard keys while drawing selections:
To add selection to another selection use Shift key.
To subtract selection from an existing selection use Alt key.
To intersect selection with existing selection use Shift+Alt key while drawing.
If one selection is drawn, existing selection will deselect.
Click on image (outside selection) with any selection key or press Ctrl+D to deselect.
To move selection click on selection with any selection tool and move to desired location of the image.

Note: Any quetions about my post please conmment and I will answer immediately.

Popular Posts