
Todays Greeting

Todays Greeting
Good Morning
Showing posts with label Photoshop Selection. Show all posts

Wednesday, 8 May 2013

Pen Tool (Photoshop) - Part 1

PEN TOOL 


Pen Tool is one of the important tools in Photoshop and located in Toolbar. The shortcut of Pen tool is ‘P’ key on keyboard. Lines drawn by Pen tool are called Paths. Each path has Anchor points. Each Anchor point has Directional lines. A Path can have any number of Anchor points and the minimum points are two (starting point and ending point). Paths can be converted into selection by pressing Ctrl+Enter key on keyboard. Vector Mask also requires Pen tool paths. When Pen tool is selected there are two options on top of the menu and those are Shape Layer and Paths. If shape layer is selected while drawing paths with Pen tool, Paths will be drawn with paths and foreground color fill. If Paths option is selected then only paths will draw. To define custom shapes (creating new shapes), the shape must be in paths mode. If path is available on image then Define Custom Shape option in Edit menu will appear and we can change into shapes.

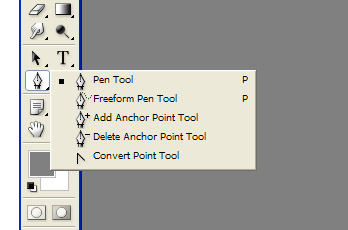
To draw Paths with Pen tool there are five types of Pen tools. Those are Pen Tool, Freeform Pen Tool, Add Anchor Point Tool, Delete Anchor Point Tool and Convert Point Tool. There are other two tools are there on tool bar called Path Selection Tool and Direct Selection Tool for controlling Pen tool paths.

Note: I will continue in my next post five types of Pen tool and how to draw paths with Pen tool.

If any questions please ask me by mail or comment.

Select Menu (Photoshop) – Part 3

Select Menu Options (Continued form previous post):


Grow – It is similar to Magic Wand Tool with Contiguous option selected. It grows the existing selection. It uses Magic Wand Tool Tolerance value to grow the selection. It selects the same color pixels inside existing selection with Magic Wand Tolerance. If two colors inside the selection, then the two color pixels will select with Magic Wand Tool tolerance.

Similar – This option works like Magic Wand Tool without Contiguous option selected. It works like Grow option but it selects disconnected areas of the image. It also uses Magic Wand Tool Tolerance value to select the pixels of the image.

Transform Selection – It works like Free Transform option in Edit menu. Free Transform transforms layer objects but Transform Selection transform for any selection. With this Transform Selection we can transform any selection on the image like Scale, Rotate, Skew, Distort, Perspective, Warp, Rotate 180, Rotate 90 CW, Rotate 90 CCW, Flip Horizontal and Flip Vertical.

Save Selection – Saves any number of selections one after one for further use. It stores in Photoshop memory. If the image is closed then saved selections will not available. To save any selection on image use this option and give same name for it. If we want other selection to be saved do the same process.

Save Selection Menu


Load Selection – Loads the saved selection. If there is any existing selection on the image while loading selection then the Load Selection popup menu shows saved selection names. Select which selection we want to load and select any of the four options (New Selection, Add to Selection, Subtract from Selection and Intersect with Selection). If there is no saved selection this option will not available.

Lad Selection Menu


Tuesday, 7 May 2013

Select Menu (Photoshop) – Part 3

Select Menu Options (Continued form previous post):


Feather – This selecting menu option is useful for giving feather (Soft edges) to already drawn selection. This feather option can be given to any selection on the image and then soft edges will apply to existing selection. If feather value is not given to any selection before drawing on the image and we want to give feather to that selection then this option is very useful. If more feather value is given in pixels, then more softness will apply to the selection. This result can be seen after apply some operations like filling color, coping image to other image or location, applying mask etc.

Note: Remaining options will continue on next post.

For questions please comment.


Modify – Modify has four options (Border, Smooth, Expand and Contract). This option is useful for selection like Magic Wand Tool selection. Border split the selection border into two selections and gives feather. Smooth is useful for rounding for sharp corners and sharp corners of the selection will convert in rounded corners with given radius. Expand is used to spread more pixels with given pixel value with same shape of selection. Contract is used to reduce the size of the selection with given value of pixels.

Sunday, 5 May 2013

Select Menu (Photoshop) – Part 2

Select Menu Options (Continued from prvious post):

Select Menu Options


All Layers – Selects all layers in layers palette. But it don’t select Background layer. Shortcut is Alt+Ctrl+A on keyboard.

Deselect Layers – Deselects all layers. There will be no selected layer in the layers palette. At that time we can’t do anything on image. To do any work like using any tool, applying filters, other operations etc. Any one of the layer must be selected. To Merge, Group and Link select more than one layers.

Similar Layers – Selects same type of layers like Text layers, Shape Layers, Mask Layers, Fill Layers, Normal Layers, Groups etc. for example if Text layer is the current layer, then all text layers in layers palette will select. If Fill layer if the current layer selected, then all fill layers in layers palette will select.

Color Range – It selects selected color with Eyedropper tool on entire layer or in any selected part of the layer. Add to Sample option to add another color to the selection. Subtract from Sample option for removing any color form selected colors. A preview window will display selected colors in grayscale. In Selection Preview menu there are None, Grayscale, Black Matte, White Matte and Quick Mask options and these show previews directly on the image. Fuzziness option is to adjust the range of selected color. If the slider moves left side less colors selected and if the slider moves right side more colors will select. Invert option to inverts the selection. It leaves the selected area and selects remaining area. On Select menu option, any color is selected, then only that color will select on the image. If re is selected then all red color pixels will select.

Color Range Menu


Note : Remaining options of Select menu will continue on next post.

Select Menu (Photoshop) – Part 1

In Select Menu there are different types of selection options. All those options related to selection only. With that selection we can do many things like deleting backgrounds, deleting unwanted areas, giving strokes, color filling, applying filters, applying masks, making brushes, making shapes, converting into shapes, applying Adjustments options, copy, cut, paste into selection, transform selected parts etc.

Select Menu


The Select Menu options are:

All – It select entire current layer of the image. The shortcut is Ctrl+A on keyboard.

Deselect – It removes any selection on the image. Shortcut is Ctrl+D on keyboard.

Reselect – It reselects (select again) last time deselected selection on image. Shortcut is Shift+Ctrl+D on keyboard.

Inverse – It inverse selection, which means it leaves selected part and selects remaining part of the image. Shortcut is Shift+Ctrl+I on keyboard.

Note : Remaining options of Select menu will continue on next post.

Saturday, 4 May 2013

Quick Mask Mode (Photoshop)

Quick Mask Mode is used to select any part of the image. It is also useful for protect any part of the image from editing. Filters, color changes, deleting etc. can be done on masked area. The shortcut of Quick Mask Mode is ‘Q’ on keyboard. Quick Mask Mode option available on toolbar below Foreground and Background colors button. By default Standard Mode is selected. Standard Mode and Quick Mask Mode buttons located side by side on bottom of the toolbar. Both modes haves the same shortcut.

Quick Mask Mode


Selecting a part of the image with Quick Mask Mode:

1. Open any image you want to select.

2. Click on Quick Mask Mode button or press ‘Q’ key on keyboard.

3. Press ‘D’ key on keyboard to set default foreground and background colors. By default foreground color is black and background color is white. Switch between Foreground and Background color by using ‘X’ key on keyboard or click on small toggle arrow with mouse.

4. After selecting Quick Mask Mode button, select Brush tool and with brush tool draw (paint with brush tool) where you want to select.

5. For painting use Black as Foreground Color and for removing painting on unwanted areas use White color as Foreground.

6. Double click on Quick Mask Mode button to get Quick Mask Options menu. In that menu select Masked Areas to change painted area into selected area. If Selected Areas option is selected the painted area will not select and the remaining area will select. By clicking on color you can change painting color and Opacity option for making painting color dark and light.

7. Now click on Standard Mode button or press ‘Q’ key on keyboard. Then the painted area will convert into selection.

Painted in Quick Mask Mode with Brush Tool


Selection after Quick Mask Mode painting


With this selection we can do anything like deleting or removing background for any image, fill color, apply color, apply layer mask etc.

For any questions please comment.

Friday, 3 May 2013

Magic Wand Tool (Photoshop)

Magic Wand Tool is a selection tool. It selects pixels based on color and tolerance. Tolerance is the main part of this tool. It selects based on given tolerance. When Magic Wand Tool is selected the Tolerance option will appear on top of menu. If more tolerance is given (enter the value in pixels between 0 to 255) large part of same color pixels with less difference will select. If less tolerance is given it selects less part of area with same color pixels will select.

Magic Wand Tool


Magic Wand tool selects same color of pixels until the edge (until other color pixel touches). The selection doesn’t enter into other color. If other color wants to be selected press Shift key on keyboard while clicking with Magic Wand tool. It adds one color of selection to other color selection. To subtract any selection, click on selection with pressing Alt key on keyboard.

Magic Wand Tool Selection and Tolerance


For smooth edges select Anti-aliased option on top menu. If Contiguous option on menu is selected, same color selects until the edge. If Contiguous is deselected, the same color without connection will select on entire image. That means if we click on red color, entire red color on the image without connection with each other will select.

Bitmap mode images and 32 bit per channel images are not useful for Magic Wand Tool.

Any doubts please comment.

Popular Posts